Integrating Office 365 with WSO2 Identity Server
Part 1: Provisioning users to Azure AD
Office 365 is subscription services offered by Microsoft. It offers the Microsoft Office Software suite and cloud-based software as a service.
WSO2 Identity Server 5.7 on-wards comes with the feature of integrating Office 365 with WSO2 IS. The integration requires the following configurations to be done as prerequisites.
- Configure the Office 365 Outbound provisioning connector in WSO2 IS
- Configure SAML-2.0 Federated Authentication with WSO2 IS
- Enable on-demand user provisioning in WSO2 IS
As the first step, let’s see how the WSO2 Identity Server is configured to provision users to the Azure AD.
What is Outbound User Provisioning
Outbound Provisioning provisions users to a trusted identity provider from the WSO2 Identity Server. A trusted identity provider is basically an identity provider that supports inbound provisioning.
Why is Outbound Provisioning needed
Microsoft Office 365 requires users in on-premises user stores synced to Microsoft Azure Active Directory in the cloud. This is needed for functionalities such as licenses management. Therefore the users in the WSO2 IS are needed to be provisioned to Azure AD.
The specialty in Office 365 Provisioning Connector provided by WSO2
The tool provided by Microsoft for the user synchronization is DirSync. A corporation has to use this tool in order to provision it’s users from the on-premises user stores to the Azure AD. The Microsoft approach of user sync limits the user stores to Active Directory. Therefore on-premises user store has to be Active Directory or moved/created in the cloud. This requires tremendous effort both for new users and for existing users in the on-premise user store.
Office 365 Outbound Provisioning Connector allows the users to be
- provisioned to the Azure AD
- de-provisioned from Azure AD
- assigned to groups in Azure AD
Once WSO2 IS is configured with the connector, it will provision a user once the desired role is assigned and de-provision a user once the desired role is removed. The user
When WSO2 IS integration with Office 365 is completely configured the role-based on demand user provisioning can be achieved where the users are automatically provisioned to Azure AD when there are successfully authenticated to Office 365 with identity federation of WSO2 IS.
Prerequisites
- Register a new application using the Microsoft App Registration Portal. For instructions on how to do this, see Registering an application in the Microsoft documentation.
- Add a new domain to Office 365 using the Office 365 Admin Portal. For instructions on how to do this, see Add A Domain to Office 365 in the Microsoft documentation.
Installing the connector
- Download the Office365 connector from the WSO2 Connectors Store.
- Copy the org.wso2.carbon.identity.outbound.provisioning.connector.office365–1.0.0.jar file to
<IS_HOME>/repository/components/dropinfolder. - Restart the server
Configuring an identity provider
First, an identity provider must be configured to accept the provisioning request from Identity Server.
The following steps give the instructions on how to create a new identity provider for Office365 provisioning in the Identity Server.
- Log on to the Management Console using your username and password.
- Navigate to the Main menu to access the Identity menu.
Click Add under Identity Providers. - Fill the details in the Basic Information section.
For more information see Adding and Configuring an Identity Provider.
Connector Configurations
- Expand Office365 Provisioning Configuration section under the Outbound Provisioning Connectors section.
- Fill out the details in the form.
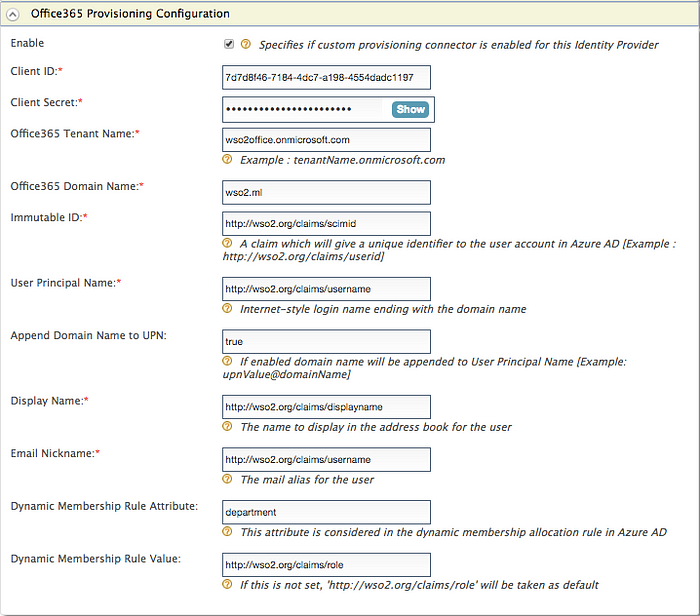
3. Do the configurations as described below.
Enable : Select the checkbox to enable Office365 identity provisioningClient ID : The application ID used to register the app in the Microsoft App Registration Portal
[Example :7d7d8f46-7184-4dc7-a198-4554dadc1197]Client Secret : The application secret used to register the app in the Microsoft App Registration PortalOffice365 Tenant Name : The organization name used to signup for Office 365
[Example : wso2office.onmicrosoft.com]Office365 Domain Name : The domain name registered in Office365 [Example : wso2.ml]Immutable ID : A valid claim which acts as the unique identifier of the user in the Azure AD
[Example :http://wso2.org/claims/scimid]User Principal Name : A valid claim which will be the Internet-style login name for the user
[Example : http://wso2.org/claims/username]Append Domain Name to UPN : If this is set to true, the domain name is appended to the UPN if it is not already there.
[Example : if the username is "Alex" and the domain name is "foo.com",the UPN will be "Alex@foo.com"]Display Name : A valid claim which is the name displayed for the user in the address book of the Azure AD
[Example : http://wso2.org/claims/displayName]Email Nickname : A valid claim as the mail alias for the user in the Azure AD
[Example : http://wso2.org/claims/username]Dynamic Membership Rule Attribute : The Azure AD user attribute considered during the execution of the dynamic membership query.
[Example : department]Note: This is an optional configuration and can be used when dynamically assigning users into groups
for provisioning in the Azure AD. The attribute must be equal to the attribute name given to the dynamic membership rule.Dynamic Membership Rule Value :The claim mapped to the attribute
[Example : http://wso2.org/claims/role]Note: This is an optional configuration and can be used when dynamically assigning users into groups
for provisioning in the Azure AD.
However, if the attribute has been set and this value has not been set, http://wso2.org/claims/role is considered as the default value.
Read user resource type for more details about user attributes.
Read Claim Management in WSO2 IS.
4. Click Register to save the changes.
Dynamic Member Allocation
Dynamic Membership Rule Attribute and Dynamic Membership Rule Value are optional configurations used when dynamically assigning users into groups in Azure AD when provisioning.
( See Configuring Azure AD for Dynamic Membership for details)
NOTE: Attribute should be equal to the attribute name that is given to the dynamic membership rule.
Role Based Provisioning
If the users are needed to be provisioned based on the roles they are assigned, do the following configurations.
- Expand Role Configuration section.
- Enter the provisioning roles.

For more information read Role Based Provisioning.
Configuring a resident service provider
WSO2 Identity server is the provisioning party in this scenario. The provisioner who initiates the request to the Office365 is the IS. Therefore the outbound provisioning identity provider must be configured against the resident service provider in order to the provision the user to Azure AD.
- Log on to the Management Console using the username and password.
- In the Main menu under the Identity section, click Resident under Service Providers.
- In the resulting screen, expand the Outbound Provisioning Configuration section.
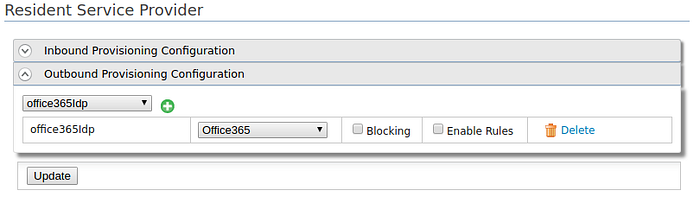
4. Select the identity provider added for Office365 outbound provisioning from the drop down menu.
5. Click on [+] icon to add it as a service provider.
6. Click Update to save changes.
Configuring Azure AD for Dynamic Membership
In Azure AD, rules can be applied to determine membership based on user properties when creating groups. All the dynamic group rules are evaluated in all the adds and removes. Dynamic group membership reduces the administrative overhead of adding and removing users.
- Create user groups with dynamic membership rules in Azure AD. Follow the guide Create a dynamic group and check status by Microsoft.
- WSO2 IS configurations for dynamic member allocation is described above.
Try it yourself
This example will use the outbound provisioning connector that is configured above. The user provisioning is role based so that the users will not be provisioned to the Azure AD until they are assigned with the role “office365Role”. (That is the role given as the provisioning role in the explained configurations.)
The example demonstrates the assigning of users into groups using dynamic membership allocation rules.
User can be permanently de-provisioned from the Azure AD by de-assigning the role from him.
Enable Claims
- Log in to the management console and click List under Claims.
- Click on the http://wso2.org/claims claim dialect.
- Click Edit on the Display Name claim and select Supported By Default to enable the claim.
4. Click Update to save.
5. Similarly, enable all the claims that you configured in the outbound provisioning configuration of the office365 identity provider.
Create User
- Click Add under Users and Roles on the Main tab of the management console.
- Click Add New User and create a user with the username ‘Alex’.
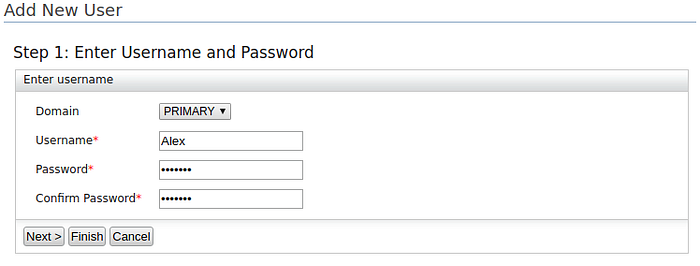
3. Click Finish. You will see the user you just created listed on the screen.
4. Click User Profile to edit Alex’s user profile and add claim values for the claims you configured in the Office365 connector IdP configurations.
In this scenario,
Username,Display Name, andUser IDare mandatory attributes for user provisioning and group assigning.
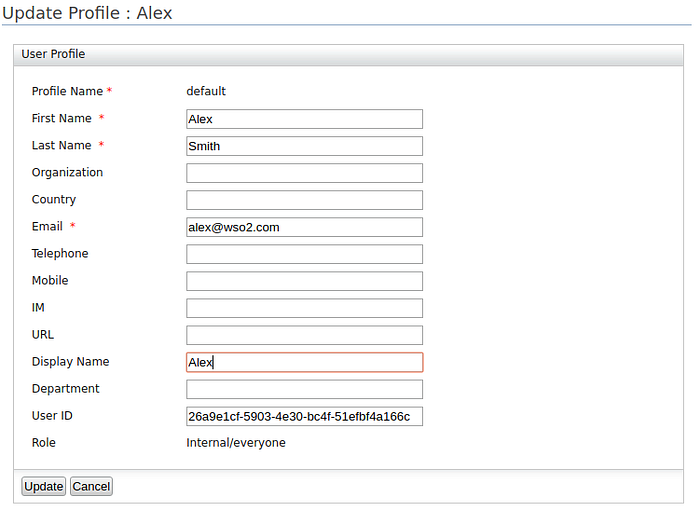
5. Click Update to save the changes.
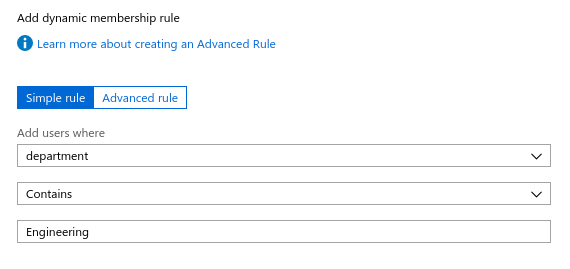
Create a user group in Azure AD
- Create a group in Azure AD. For more information read Microsoft documentation Create a dynamic group and check status
- In this example, there is a group named
Engineerwith the dynamic membership rule is as follows.
Assign the role
- Login to the WSO2 IS management console.
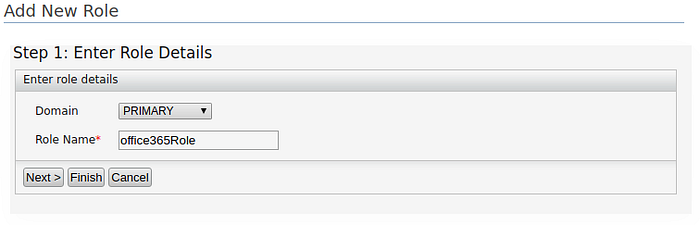
- Click Add under Users and Roles and then click Create New Role.
- Create the two new roles named
office365RoleandEngineering - Click Next.
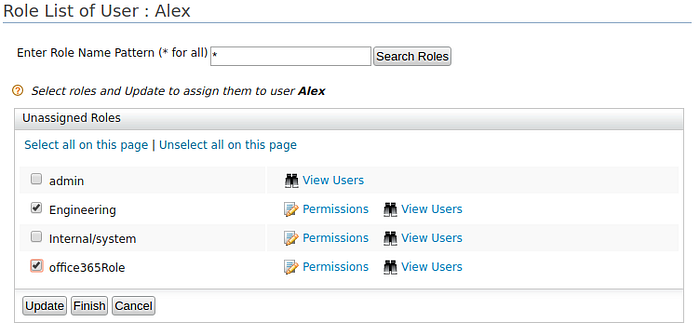
5. Assign login permission to the role office365role.
6. Assign the user ‘Alex’ to the role office365Role and Engineer.
Verifying
When the role is assigned to the user, Alex, he will be provisioned to the Azure AD. This might take few seconds.
Now check the Azure AD portal, the user Alex will be provisioned there.
In the connector configuration, we have given the dynamic membership rule attribute as the department in Azure AD user profile to map with the user role of WSO2 IS user.
User John has the roles Engineering and office365Role. Therefore the dynamic membership rule is satisfied. Therefore John will be added to the group “Engineering” at the provisioning time itself.
Since Alex has the role Engineering, the dynamic membership rule for the Engineer group in Azure AD is satisfied. Therefore Alex will be added to the group “Engineer” at the provisioning time itself.
Summary
This article contains how to configure the WSO2 IS Office 365 Outbound Provisioning Connector. This is the initial step of the integration of Office 365 with WSO2 IS. This connector provisions on-premise users to the Azure AD with the assignment of a specific role and will de-provision with the role removal.
See you soon with the article for phase two of this integration.
References
- Adding an Identity Provider in WSO2 IS
https://docs.wso2.com/display/IS570/Adding+and+Configuring+an+Identity+Provider - Role based provisioning in WSO2 IS
https://docs.wso2.com/display/IS570/Role+Based+Provisioning - Update user profile in WSO2 IS
https://docs.wso2.com/display/IS570/Configuring+Users#ConfiguringUsers-Updateusers - Create roles in WSO2 IS
https://docs.wso2.com/display/IS570/Configuring+Roles+and+Permissions#ConfiguringRolesandPermissions-Addingauserrole - Assign Roles in WSO2 IS
https://docs.wso2.com/display/IS570/Configuring+Users#ConfiguringUsers-Assigningrolestotheuser
